
Meg Tomlinson Photography Blog
Categories
Archive
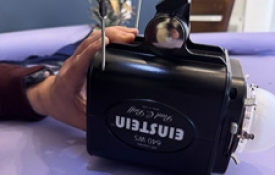
0 Noisy Einstein Light? Replace the fan!
If you’ve been using a Paul Bluff Einstein strobe light unit for some time now, you may notice it getting noisier over time. The unit’s inner cooling fan is the likely culprit. Dust build-up, or a worn bearing can cause vibration or whining sounds when running that are especially noticeable during quiet studio sessions. WHAT YOU’LL NEED: Replacement fan (matching voltage, size, and connector) Find the one I used here: https://a.co/d/b5LhUfC Small Phillips screwdriver/Cordless drill Compressed air Clean workspace Gloves (precaution for removing bulb) BEFORE STARTING : Power down and unplug unit fully. Before opening, ensure unit is fully cool. STEP 1: Using a Phillips head screwdriver, start by removing the four case-half screws - they’re long so you may want to use a cordless drill for these! Next, lift the lower case half off, exposing the inside of the unit. (Slide the Einstein Logo pieces out and set aside.) STEP 2: Gently lift entire inner components out of lower plastic case half. Remove back button/screen panel (buttons may fall out but are easily put back in again later, so just set these aside as well) STEP 3: In this step, we will remove the middle circuit board with the fan attached. Do so by pinching the circuit board in one hand and holding the back end of unit with your other hand. A very slight rocking motion while gently pulling can help ease the connections apart. Do not bend or forcefully pull! Repeat to remove from other end. STEP 4: Wearing gloves (I used silk here) remove modelling bulb from circuit board. Reason for removing is as a precaution while handling, as oils from your hands will cause bulb to burn out ! STEP 5: Remove 3 mounting screws from fan and circuit board. Unplug fan connection. Install new fan ensuring fan is mounted the correct direction - as shown in photo with label facing down. Coil excess wiring around the outer perimeter of the fan and plug back in to circuit board. *Notes: I left lock washers for mounting the fan out due to clearance issues. Also had to gently shave a bit of the sides in the plastic off the fan to fit in between the capacitors — this may be due to possibly not using the 100% correct fan as I did not purchase directly from Paul Bluff but hey - sometimes a little DIY is worth saving some $$ ! You are now ready to begin reassembling the unit. Repeat steps 1-5 in REVERSE ORDER — don’t forget your buttons and logo panel!!!!! I hope you found this tutorial useful, and it helps inspire you to take it upon all Photographer’s to fix their own noisy Paul Bluff Einstein light (on a budget too!)

0 How I Created the Viral All-White Window Studio — In a Tiny Space (Without Permanent Walls)
Being a professional in this industry for 10 years now, I’ve learned there’s room for everyone — no need for gatekeeping. Inspiration can come from anywhere, and I hope you’ll find some of your own through this blog. If I can share a small hack or budget-friendly idea to help another Photographer create something beautiful for their clients — especially without spending thousands of dollars — I’m ALWAYS going to share. Because after all, creativity, trends, poses, editing styles or marketing ideas aren't owned by ANYONE. A lot of people are creating similar things because that’s simply how creative industries work! And lately, everyone’s been loving the viral all-white “window studio” look. Soft whites, dreamy curtains, glowy light. It’s timeless and simple. I recently had a client request for this style which is not usually my norm, but I'm always excited to try something new if I can accommodate the request.Keep reading because in this blog I will show you how you, too, can create your own all white set up easily, with just a few inexpensive items! The space I shoot in isn’t huge by any means ( roughly 200 sq ft.) So having a dedicated lifestyle room just isn’t realistic for me. Learning how to transform a small space has honestly become one of my favorite creative challenges. I love finding little hacks and ways to make one area work multiple ways. Personally, I hate feeling boxed into one specific style all the time. I love stretching my brain creatively and figuring out ways to make things work without needing a full renovation, giant budget or massive studio space. You've got to be a chameleon of sorts in this industry! Here’s exactly how I created my easy, removable, all-white window studio setup , complete with links: Step 1: Create a Room Without Building Walls The first thing I needed was a way to create the illusion of a room. It had to be easily removable, affordable, practical, usable in a small studio and portable if needed. I found the perfect solution with this room divider/backdrop stand from Amazon: Room Divider Backdrop Stand The best part? You could literally set this up anywhere. It functions like a backdrop stand while helping create the structure of a room. It's so perfect for those renting studio space, those with small studios, or anyone who doesn’t want to construct permanent walls. Step 2: Use LOTS of Sheer Curtains Personally, I prefer not to see my direct light source behind the curtains. I want the light to feel soft, natural, and dreamy almost like real window light. That’s why I LOVE the IKEA Lill lace curtains. They’re inexpensive, lightweight and diffuse light beautifully. The trick is using a lot of them. I probably use around 15 pairs in my setup to really soften and spread the light evenly. The layered look also adds so much texture and movement to the space. Step 3: Fake a Giant Window Now let’s talk about the real magic: the light wall. A lot of photographers creating this look are using mounted LED wall panels. But if you don’t have a usable wall or you need flexibility, this modifier will completely change the game for you. I use the Angler Illuminated Background in the 6x7' size. It’s basically one giant light modifier that works with the strobe light you already own. It creates the softest, most beautiful diffused light and is great for backlit shots! What I love most about it is it comes in multiple sizes to fit ANY space, folds flat, and is totally transportable and fairly inexpensive. Step 4: Add a (White) Seamless Backdrop Last but definitely not least: your backdrop/wall. This will create that clean, seamless, airy look that makes the entire setup feel like a real room. For my setup, I used the 7ft Savage Seamless Paper in Super White. You'll want to go as wide as you can to get the the most usable shooting space. And that’s honestly it. No permanent walls. No massive renovations. No giant studio required. Just a few simple items! Here's a pullback image of my set up : I think sometimes people assume you need a huge expensive setup to create beautiful work. Truthfully, some of my favourite things I’ve created came from figuring out how to make a tiny space work harder. If you have questions about my setup, lighting or how I use the space — my inbox is always open Xo,Meg

0 The Real Cost of Cheap Photography (And Why I Changed My Pricing)
I told myself it was temporary, that "I'm new." I told myself it was how you “get experience,"how you "get clients." I told myself "I’ll just raise my prices later." What I didn’t realize back then, was that charging the next to nothing price wasn't helping my business grow — it was quietly burning me out. Cheap Pricing Has a Hidden Cost I was shooting constantly, editing late into the night, saying yes to everything and still struggling to make it make sense financially. The math never worked, because it couldn't work at those prices I was charging. It was quickly becoming an expensive hobby that was taking up a lot of my time. The “All-Inclusive” Mindset In the beginning of my career (when this was still just a side gig), I thought the answer to gaining and keeping clients was to give more photos. Bigger galleries. Everything included. 30+ edited images, delivered every time. But here’s the question no one ever really asks:How many of those images actually get shared, printed or displayed? Most don’t. I've seen it personally.They sit on phones, hard drives, and cloud storage — all those images carefully edited, thoughtfully captured, to be rarely seen or thought about again. When images are handed over in bulk, they lose their intention. They become something to scroll past instead of something to live with. Editing dozens of photos just so they can sit hidden on a device doesn’t serve the work, the client or YOU (the photographer.) Burnout Isn’t Sustainable A business that isn’t profitable isn’t sustainable. Truth: It's just an expensive hobby that you have. A photographer who never stops working, may quickly find themselves not enjoying the work at all. Once I shifted my pricing — and my approach — everything changed.I focused on creating fewer, stronger images. Images meant to be printed, displayed and revisited over and over again. Images chosen with care instead of buried in excess gallery full of similar or the same images. I worked less, but better. I showed up more present for my family. The work itself held more meaning. And my expensive hobby became a sustainable and profitable business. Undercutting Hurts the Entire Industry You may not realize it, but charging next to nothing and giving your images away doesn’t just affect one business. It plays a part in reshaping expectations across the ENTIRE photography industry - the very one YOU hope to be profitable in. It gives clients the message that photography is disposable, not a luxury. That someone will come along who will always do it cheaper. That education, experience, and talent don’t carry any real value. And eventually, when you need to raise your prices to survive and be profitable (and you will!) , you’ll be left undoing every single one of those very expectations. Price With Purpose From The Start Fair pricing isn’t about greed. It’s about longevity. It’s about building a business that allows space for creativity, for family and for a life outside of work — while honoring the value of the images themselves.It's about building a sustainable business and keeping this industry sustainable.

0 Baby-soothing Products Every Newborn Photographer Needs!
The goal of any successful Newborn Session is to get beautiful portraits of your baby in poses, all the while keeping them calm and content in the process. We all know babies can be challenging. They could be fed, burped and all needs met yet may still need a bit of extra soothing. We also know that not all babies are the same. While some may like the sound of a loud SHUSH , others may just need a gentle vibration to soothe them into that slumber needed for a successful Newborn Session. In this post I will talk about 3 Must-Have soothing tools that I keep handy in my studio and use frequently in my sessions. First, you've got to set the overall environment. When baby arrives to my studio, the lights are already off (except for the modelling light from my PLM) and my White Noise Machine is already going. The White Noise Machine I currently use is no long available on Amazon so I can't link it, but I would suggest looking for one that also has Brown/Pink noise, or fan noises. I find these sounds to be less harsh than regular WHITE noise is. Next up, is the Shhhhussshhing. After you've shushed enough times yourself during a Newborn Session, you find something that does it for you. Many of us in the industry use these little devices because they are small and portable. They easily tuck next to baby in a prop, or near them on the table. The loud shushing noise of these can really help to 'snap' baby out of a crying or fussing fit. You can find it on Amazon [HERE] If you want a cheaper option, the same company does also offer an App for both Android and iPhone users for a one time purchase of about $6.99. Rocking. Some babies just need that little bit of movement to lull them. But what if you're like me and you use a table to do your posing and don't use an assistant - making it difficult to jiggle, pose and perfect baby all at the same time?! Even the initial transition of putting baby down onto the table from my arms can be a big one, resulting in baby needing some settling. That's where the RockIt comes in. What is it? The RockIt is a portable baby rocker device that you can strap to a stroller, or bassinet etc to make it rock slowly or quickly. It sort of mimics the constant gentle jiggling movements of a car ride. I have mine strapped to the leg of my table in just a way so that it rocks the table if I need it. Super handy for those extra fussy or touchy babies while going through your table flow! Get it [HERE] Another option that may serve better for Newborn Photographers using a bean bag instead of a hard surface table for posing, would be the Baby Brezza soothing mat. This mat can be easily tucked under all your posing layers , offers multiple soothing rhythms and can be easily controlled via an app on your smart phone. Get it [HERE] Last but not least, the Lullavibe. It does exactly what it sounds like. It is a totally portable soft covered paddle that offers soothing constant vibration. I find this especially comes in handy for use when you’ve got baby in the potato sack pose , or when you have baby in pose on the table. A little vibration to the bum or back seems to do the trick in most cases! I like this tool as well because it offers just a bit of weight which can help keep baby feeling secure when rested against their little bodies. Get it [HERE]