
Meg Tomlinson Photography Blog
Categories
Archive

0 So... You Want to Turn Your Hobby Into a Business?
So... You Want to Turn Your Hobby Into a Business? At some point, every creative has the same thought: "People keep telling me I should charge for this." Maybe you're a photographer, make custom tumblers, bake incredible cookies, beautify people, build furniture, or create artwork. Whatever your hobby is, turning it into a business is exciting! But before you open a studio, start taking orders or booking clients, there are a few important things you should do first. It might not be the most exciting part, but getting these things sorted now can save you a lot of stress later. Get a Business Licence This is the very first thing thing you should be worried about. Every city or town has different rules about running a business, but most require ALL operating business to carry a business licence. It usually doesn't take long, is inexpensive and it makes your business official from day one. Make Sure You're Allowed to Run a Business From Home! A lot of businesses start at home, and that's awesome for your overhead costs! But before you set up your workspace or invite clients over, make sure your property is actually allowed to operate your business. For example, here in Kamloops, the city does not allow businesses to run out of rental suites or secondary suites and have some restrictions on customers coming to your home. A quick phone call or visit to your city's website to research regulations can save you from finding out the hard way (ie. fines, or forced closure of your business)Once you've applied for your license, an Inspector will make a personal visit to your residence to make sure you are in compliance with all regulations before making their recommendation to the city. Talk With Your Home Insurance Provider This is one step that catches a lot of new business owners off guard. Please do not assume your home insurance is enough. Your regular home insurance probably doesn't cover your business. If you have expensive equipment, inventory, or clients coming to your house, it's worth calling your insurance company and letting them know you've started a business. They'll tell you if you need to add extra coverage such as increased liability protection, or equipment coverage. It's a simple step that could save you thousands if something unexpected happens! Get Business Insurance Think of business insurance as a safety net. If someone gets hurt while visiting your workspace, you accidentally damage someone's property, or something else goes wrong, business insurance can help protect you. Nobody starts a business expecting something bad to happen—but it's always better to be prepared than caught off guard. Accidents are rare—but they do happen. Insurance provides peace of mind so you can focus on growing your business instead of worrying about worst-case scenarios. Separate Your Business Finances It might feel easy to just use your personal bank account when you're first starting out, but keeping your finances separate makes bookkeeping, taxes, and budgeting far easier. Consider opening a business bank account dedicated to business related purchases and expenses only, a separate savings account to keep taxes you'll need to pay separate, and a bookkeeping system / Accountant. Even if your business starts small, good financial habits will save countless hours later. Understand Your Tax Responsibilities This is probably one of the biggest myths I hear : "I don't have to claim my income until I make $30,000." NOT TRUE. AT ALL. The $30,000 threshold only applies to GST/HST registration. Once your business earns more than $30,000 in gross revenue over the required period, you'll generally need to register for a GST/HST account, start charging GST/HST (where applicable), and remit it to the CRA. But your business income is taxable from your very first dollar earned. Whether you make $500 or $50,000, you're required to report your business income and expenses when you file your personal tax return. As a sole proprietor, this is typically done using a T2125 (Statement of Business or Professional Activities) alongside your personal tax return. My biggest piece of advice? Keep every receipt and track every dollar that comes in and goes out. It'll make tax season so much easier. And one more thing—don't assume the CRA won't know about your side business. Payment processors, online marketplaces, and financial records can all provide information. Failing to report business income isn't just a mistake—it can be considered tax fraud and may lead to penalties, interest, or an audit. If taxes make your head spin, there's absolutely no shame in talking to an accountant early on. A little professional advice can save you a lot of stress (and money) later. Use Contracts (Even With Friends) When you're first starting out, your first customers are usually family and friends. Even then, it's a good idea to have a simple contract or agreement. It helps everyone know exactly what's included, when payments are due, and what to expect. It's not about not trusting people—it's about keeping everyone on the same page. Don't Feel Like You Need Everything Figured Out Starting a business can feel overwhelming because there are so many things people tell you that you "have" to do. The truth is you don't need the fanciest logo, the perfect website, or thousands of followers to get started. You just need a solid foundation. Take care of the legal stuff first, protect yourself with the right insurance, and make sure you're following your local rules. Once that's done, you can focus on what you actually love doing. Final Thoughts Turning your hobby into a profitable business is an exciting milestone, but success isn't just about talent—it's about building a business that can grow safely and sustainably. Before your first client walks through the door or your first order ships out, make sure you've checked the legal boxes, protected yourself with the right insurance, and confirmed you're operating within your local regulations. Your future self will thank you. After all, the best businesses aren't just built on passion—they're built on preparation.
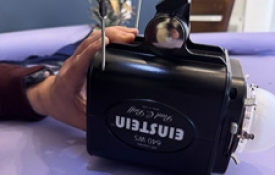
0 Noisy Einstein Light? Replace the fan!
If you’ve been using a Paul Bluff Einstein strobe light unit for some time now, you may notice it getting noisier over time. The unit’s inner cooling fan is the likely culprit. Dust build-up, or a worn bearing can cause vibration or whining sounds when running that are especially noticeable during quiet studio sessions. WHAT YOU’LL NEED: Replacement fan (matching voltage, size, and connector) Find the one I used here: https://a.co/d/b5LhUfC Small Phillips screwdriver/Cordless drill Compressed air Clean workspace Gloves (precaution for removing bulb) BEFORE STARTING : Power down and unplug unit fully. Before opening, ensure unit is fully cool. STEP 1: Using a Phillips head screwdriver, start by removing the four case-half screws - they’re long so you may want to use a cordless drill for these! Next, lift the lower case half off, exposing the inside of the unit. (Slide the Einstein Logo pieces out and set aside.) STEP 2: Gently lift entire inner components out of lower plastic case half. Remove back button/screen panel (buttons may fall out but are easily put back in again later, so just set these aside as well) STEP 3: In this step, we will remove the middle circuit board with the fan attached. Do so by pinching the circuit board in one hand and holding the back end of unit with your other hand. A very slight rocking motion while gently pulling can help ease the connections apart. Do not bend or forcefully pull! Repeat to remove from other end. STEP 4: Wearing gloves (I used silk here) remove modelling bulb from circuit board. Reason for removing is as a precaution while handling, as oils from your hands will cause bulb to burn out ! STEP 5: Remove 3 mounting screws from fan and circuit board. Unplug fan connection. Install new fan ensuring fan is mounted the correct direction - as shown in photo with label facing down. Coil excess wiring around the outer perimeter of the fan and plug back in to circuit board. *Notes: I left lock washers for mounting the fan out due to clearance issues. Also had to gently shave a bit of the sides in the plastic off the fan to fit in between the capacitors — this may be due to possibly not using the 100% correct fan as I did not purchase directly from Paul Bluff but hey - sometimes a little DIY is worth saving some $$ ! You are now ready to begin reassembling the unit. Repeat steps 1-5 in REVERSE ORDER — don’t forget your buttons and logo panel!!!!! I hope you found this tutorial useful, and it helps inspire you to take it upon all Photographer’s to fix their own noisy Paul Bluff Einstein light (on a budget too!)

0 How I Created the Viral All-White Window Studio — In a Tiny Space (Without Permanent Walls)
Being a professional in this industry for 10 years now, I’ve learned there’s room for everyone — no need for gatekeeping. Inspiration can come from anywhere, and I hope you’ll find some of your own through this blog. If I can share a small hack or budget-friendly idea to help another Photographer create something beautiful for their clients — especially without spending thousands of dollars — I’m ALWAYS going to share. Because after all, creativity, trends, poses, editing styles or marketing ideas aren't owned by ANYONE. A lot of people are creating similar things because that’s simply how creative industries work! And lately, everyone’s been loving the viral all-white “window studio” look. Soft whites, dreamy curtains, glowy light. It’s timeless and simple. I recently had a client request for this style which is not usually my norm, but I'm always excited to try something new if I can accommodate the request.Keep reading because in this blog I will show you how you, too, can create your own all white set up easily, with just a few inexpensive items! The space I shoot in isn’t huge by any means ( roughly 200 sq ft.) So having a dedicated lifestyle room just isn’t realistic for me. Learning how to transform a small space has honestly become one of my favorite creative challenges. I love finding little hacks and ways to make one area work multiple ways. Personally, I hate feeling boxed into one specific style all the time. I love stretching my brain creatively and figuring out ways to make things work without needing a full renovation, giant budget or massive studio space. You've got to be a chameleon of sorts in this industry! Here’s exactly how I created my easy, removable, all-white window studio setup , complete with links: Step 1: Create a Room Without Building Walls The first thing I needed was a way to create the illusion of a room. It had to be easily removable, affordable, practical, usable in a small studio and portable if needed. I found the perfect solution with this room divider/backdrop stand from Amazon: Room Divider Backdrop Stand The best part? You could literally set this up anywhere. It functions like a backdrop stand while helping create the structure of a room. It's so perfect for those renting studio space, those with small studios, or anyone who doesn’t want to construct permanent walls. Step 2: Use LOTS of Sheer Curtains Personally, I prefer not to see my direct light source behind the curtains. I want the light to feel soft, natural, and dreamy almost like real window light. That’s why I LOVE the IKEA Lill lace curtains. They’re inexpensive, lightweight and diffuse light beautifully. The trick is using a lot of them. I probably use around 15 pairs in my setup to really soften and spread the light evenly. The layered look also adds so much texture and movement to the space. Step 3: Fake a Giant Window Now let’s talk about the real magic: the light wall. A lot of photographers creating this look are using mounted LED wall panels. But if you don’t have a usable wall or you need flexibility, this modifier will completely change the game for you. I use the Angler Illuminated Background in the 6x7' size. It’s basically one giant light modifier that works with the strobe light you already own. It creates the softest, most beautiful diffused light and is great for backlit shots! What I love most about it is it comes in multiple sizes to fit ANY space, folds flat, and is totally transportable and fairly inexpensive. Step 4: Add a (White) Seamless Backdrop Last but definitely not least: your backdrop/wall. This will create that clean, seamless, airy look that makes the entire setup feel like a real room. For my setup, I used the 7ft Savage Seamless Paper in Super White. You'll want to go as wide as you can to get the the most usable shooting space. And that’s honestly it. No permanent walls. No massive renovations. No giant studio required. Just a few simple items! Here's a pullback image of my set up : I think sometimes people assume you need a huge expensive setup to create beautiful work. Truthfully, some of my favourite things I’ve created came from figuring out how to make a tiny space work harder. If you have questions about my setup, lighting or how I use the space — my inbox is always open Xo,Meg

0 Newborn Photos With Toddlers or Siblings: What to Expect
If you’re a Kamloops mom of a toddler expecting a new baby and thinking about booking a newborn photo session, you might be wondering how it’s all going to work. Will your toddler cooperate?Will it feel chaotic?Is it even worth it in this busy season? I understand those questions deeply — both as a mom and as a newborn photographer. Toddlers Are Not Tiny Adults Toddlers feel big emotions in small bodies. They might be excited about the new baby, unsure about sharing you, shy in a studio setting or full of energy Sometimes all within five minutes. When siblings are involved, I don’t expect perfection. I expect personality. As your Kamloops Newborn photographer, I plan sessions with that in mind. We Work Around Your Toddler — Not Against Them As a photographer, my approach shifts the moment a toddler walks into the room. We typically plan sibling and family photos for the end of the session. Little ones aren’t meant to wait around for long stretches, so this keeps things relaxed and pressure-free. Watching mom and dad go first can also help them feel more at ease and confident when it’s their turn. The fastest way to gain connection is to let it unfold naturally. Magic Is in the Small Moments Some of the most beautiful sibling images I’ve ever delivered happened in less than three minutes. A quiet lean in.A curious touch of baby’s toes.A proud smile that flickered for half a second. We don’t need long stretches of stillness. Small, genuine connection - that’s what I’m always watching for. You Don’t Need to Stress About Behavior If you’re worried your toddler will “ruin” the session, please hear this gently: They won’t. I don’t expect them to sit perfectly or smile on command. I expect them to be two, or three, or four. As a mom, I know the pressure you feel walking into something like this. As a photographer, I’m here to carry that pressure for you. You can focus on loving your babies.I’ll handle the rest. How to Prepare for Newborn Photos With Siblings A little preparation can make your newborn session feel smoother. Try to: Talk positively about the photo session Avoid big expectations or pressure Bring snacks or comfort items Let your toddler know they’ll get breaks The more relaxed you feel, the more relaxed they’ll feel. And if things feel a little chaotic? That’s okay too. Why These Images Matter So Much There is something incredibly tender about welcoming a new baby while still mothering a toddler. You’re stretched.You’re tired.Your heart is somehow bigger than ever. As a newborn and family photographer, I see how powerful these images become over time. They capture the very beginning of a sibling bond, your toddler stepping into a new role and your growing family in its new season. These aren’t just newborn photos. They’re part of your family’s evolving story. It might feel overwhelming to add “photo session” to your newborn season. But I promise you this — you won’t regret documenting it. Even if it’s a little chaotic.Even if your toddler needs breaks.Even if everything doesn’t go exactly as planned. Because this stage — the one where your family is growing and adjusting and learning each other — is beautiful in its own imperfect way. And it deserves to be remembered. Looking for a Kamloops Newborn Photographer Who Understands Growing Families? If you’re expecting and wondering how newborn photos will work with your toddler or older children, I’d love to create a session that feels calm, baby-led, and true to your family. LET'S CHAT !

0 Before the Frosting Flies: How to Prepare for a Cake Smash Session
Your baby’s first birthday is a milestone that deserves to be celebrated in a way that feels joyful, relaxed, and true to your little one. A cake smash session is exactly that — playful, a little messy, and full of personality. With just a little preparation, we can help make sure your little one walks into their session feeling confident and happy (and that you walk in feeling calm too)! Don’t Make It Their Very First Taste of Cake If your baby has never experienced frosting before, the texture can be surprising. Sticky, soft, sweet — it’s a lot for tiny hands and curious minds. I encourage my clients to try a small “practice run” at home about a week or two before your session. It doesn’t have to be elaborate. A cupcake topped with a bit of whipped cream, or even yogurt with a similar texture works perfectly. Let them explore with their hands. Let them squish. Let them investigate. This can help remove the “what is this?” reaction and replace it with curiosity and confidence when a bigger cake is placed in front of them at their session. Being a mom myself, I know this stage can be a bit sensory-heavy for one-year-olds. Should your little one find the textures overstimulating, I have simple alternatives on hand (such as a wooden spoon and one-of-a-kind wooden cake) as a comfortable alternative so the session can still feel relaxed and enjoyable. So you can rest assured that no matter what, you can leave your session with beautiful photos and a happy baby! Protect the Nap Schedule Mood is everything at this age. The best cake smash sessions happen when baby is well rested, fed (but not overly full) and in their natural happy window. If your little one thrives in the morning, we aim for that sweet spot. If they’re happiest mid-morning after their first nap, we work around it. A rested baby equals more smiles, more energy, and more willingness to dig into that cake! Keep Outfits Simple and Timeless Less is more. Soft textures, neutral tones, simple rompers or overalls photograph beautifully — especially if you love timeless, heirloom-style imagery. Busy patterns can distract from what truly matters: your baby’s expressions. I have a full client closet of carefully curated outfits that my clients are welcome to choose from, so you don't have to go out and buy something just for one short session. Barefoot is always perfect. And don’t forget: A backup outfit -- and extra shirt for you too as you may be wrangling your little one who's covered in frosting! Wipes Their favourite little snack (puffs, yogurt bites, goldfish) in case we need to hide them in the cake Something comfy for the ride home Bring a Comfort Item (Just in Case) Even the most outgoing little ones can feel unsure in a new space. If your baby has a favorite lovey, soother, or small stuffed animal, bring it along. We may tuck it out of sight during photos, but having it nearby can provide reassurance and help them settle quickly. Sometimes the comfort item even sneaks into a few sweet frames — and those can become some of the most meaningful images. Let Go of "Perfect Pinterest" Expectations Here’s the honest truth: not every baby “smashes.” Some dive in headfirst.Some gently poke.Some prefer to study the situation before committing.Some just cry and never touch the cake. And every single reaction is perfect. The magic of a cake smash session isn’t in how aggressively they destroy the cake — it’s in their personality. The frosting-covered concentration face. The hesitant fingertip taste. The full belly laugh. Those are the moments we capture. A Little Note for Parents: If you feel relaxed, your baby will too. These sessions are meant to be joyful and pressure-free. There is no performance required. No expectation for perfection. Just celebration. One whole year of growth.One whole year of love. If you’re a Kamloops mom who is planning your baby's First Birthday , I would love to create a custom Cake Smash Session to mark this milestone for you! I offer many Cake Smash themes - like "Where the Wild Things Are" Cake Smash Session shown in this blog - to more minimal, monochromatic style. I am always happy to collaborate and come up with something new while still staying true to my style ! Check out MY PORTFOLIO QUESTIONS? READY TO BOOK YOUR BABY'S FIRST BIRTHDAY CAKE SMASH? LETS CHAT!

0 Preparing for Your Maternity Session with a Toddler - A Gentle Guide For Kamloops, BC Moms Expecting Baby #2 (or #3)
If you’re pregnant (or hoping to be) and already have a toddler at home, you might be wondering just how a Maternity Photo session with them included may go. “Will my toddler even cooperate?”“What if they don’t sit still?”“Is this going to be chaotic?” My honest answer? It might be a little wild, yep!But it will also be tender, emotional, and beautifully real. As a Maternity and Newborn Photographer here in Kamloops, BC, I photograph this season often — and I promise you this: toddlers don’t ruin maternity sessions. They make them meaningful. Here’s how to prepare so your session feels calm, connected, and true to this season of life you are in : Toddlers don’t perform on cue — and they shouldn’t have to! The most powerful images rarely come from perfectly posed smiles, but instead from: A tiny hand resting on your belly A curious glance A shy cuddle Movement and closeness Your toddler being exactly who they are right now? That’s the real magic. n Kamloops, I often shoot my Maternity sessions during golden hour — especially in Summer and Fall when the light is soft and warm, and the temperature cools off a bit. If possible: Avoid nap transitions Make sure they’re fed beforehand Keep the day simple leading up to the session A well-rested, well-fed toddler changes everything. Toddlers love purpose. Instead of asking them to just “smile at the camera,” I might ask them to: Kiss the baby Listen for baby Hold mom’s hand Run up to give you a hug Walk with you through the grass Lead you to me When they feel involved, connection comes naturally. Soft fabrics. Neutral tones. Clothing they can move in. Whether we’re shooting outdoors in the Kamloops hills or in studio, comfort matters most. Scratchy outfits or stiff shoes are the fastest way to derail a toddler’s mood. Timeless and minimal always photographs beautifully — and it lets your connection take centre stage. I gently guide every session, but we don’t force moments. If your toddler needs a break, a wander or just a quiet minute - that’s okay. Some of the most meaningful images happen when we pause and let them come back in their own time. This season will be over before you know it. You are growing a new life while still carrying, loving, and mothering the one who made you a mama in the first place. That in-between space — where your toddler is still your baby, but not for much longer — deserves to be remembered honestly. Not perfectly.Not stiffly posed.Just truthfully. Bonus Tip: Bring Snacks (Yes, Really) Non-messy snacks are always welcome. Think simple, quick bites that won’t stain outfits. If your toddler has a comfort item — bring it. Sometimes it stays in the car. Sometimes it sneaks into a photo. Either way, it’s part of their story. If you’re pregnant, trying to conceive, or quietly planning baby #2 while chasing a toddler around your living room — know this: You don’t need a perfectly behaved child for beautiful maternity images. You just need to show up as you are. The rest? I’ll guide. So all you have to worry about being present in this moment. If you’re ready to document this season in a timeless, softly moody way — one that honours both the baby you’re growing and the little one holding your hand — I would love to photograph it for you here in Kamloops, BC. Because this chapter matters, too. ????
0 How (and Why) I Choose My Outdoor Photography Locations For Kamloops Family and Maternity Sessions
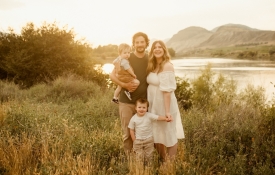
A client recently asked, "Why do you choose the locations you do?" For me, when it comes to outdoor photography, location isn’t just a backdrop — it’s part of my creative process for every session. Every place I shoot is chosen intentionally, and there’s a lot of thought behind where we go and when we’re there. Light is always my starting point. I spend a lot of time scouting and learning my locations — how the sun moves through them, when the light turns soft, where it filters just right, what direction it comes from and when it disappears completely. Knowing this allows me to work confidently and efficiently, even when things don’t go exactly as planned. Like one evening, just a couple years ago. My daughter and I had just finished dinner clean-up and I'd just put her in the bath tub when all of a sudden I received a text from a client and realized I’d completely forgotten about our session! By that time, we had roughly 30 minutes before the sun was gone! No panic — because I had my go-to location 10 minutes from my house. I knew exactly where the light would be in those final moments, which direction to shoot, and how to move quickly without rushing the experience. The session came together beautifully, and you’d never know we were racing the sunset. That kind of confidence only comes from familiarity. (It is actually one of my very favourite Kamloops family sessions still to this day -- and it's the one you are seeing in the images throughout this blog post!) I also choose locations that offer privacy. Many of the spots I use are quiet and tucked away, so you can feel relaxed without feeling watched. Privacy creates comfort, and comfort creates honest images. When you’re not distracted by people passing by, it’s easier to be present and be yourself. Another reason I return to the same locations is simply trust. I know how to adapt if clouds roll in, if the light shifts early, or if we’re working with a tight window. Less wandering, less guessing — more creating. And yes, I intentionally gatekeep some of my best locations. When spots are over-shared, they quickly become overcrowded, overused, and lose what made them special in the first place. By protecting certain spaces I like to use, I’m able to keep them quiet and private. Most importantly, this protects your experience. You get space to slow down, feel comfortable, and stay connected to the moment. These locations aren’t just points on a map —I've taken the time to scout them out and they’re part of my creative process; knowing them deeply allows me to show up prepared, calm, and ready to create something meaningful, no matter what our timeline looks like.

0 The Real Cost of Cheap Photography (And Why I Changed My Pricing)
I told myself it was temporary, that "I'm new." I told myself it was how you “get experience,"how you "get clients." I told myself "I’ll just raise my prices later." What I didn’t realize back then, was that charging the next to nothing price wasn't helping my business grow — it was quietly burning me out. Cheap Pricing Has a Hidden Cost I was shooting constantly, editing late into the night, saying yes to everything and still struggling to make it make sense financially. The math never worked, because it couldn't work at those prices I was charging. It was quickly becoming an expensive hobby that was taking up a lot of my time. The “All-Inclusive” Mindset In the beginning of my career (when this was still just a side gig), I thought the answer to gaining and keeping clients was to give more photos. Bigger galleries. Everything included. 30+ edited images, delivered every time. But here’s the question no one ever really asks:How many of those images actually get shared, printed or displayed? Most don’t. I've seen it personally.They sit on phones, hard drives, and cloud storage — all those images carefully edited, thoughtfully captured, to be rarely seen or thought about again. When images are handed over in bulk, they lose their intention. They become something to scroll past instead of something to live with. Editing dozens of photos just so they can sit hidden on a device doesn’t serve the work, the client or YOU (the photographer.) Burnout Isn’t Sustainable A business that isn’t profitable isn’t sustainable. Truth: It's just an expensive hobby that you have. A photographer who never stops working, may quickly find themselves not enjoying the work at all. Once I shifted my pricing — and my approach — everything changed.I focused on creating fewer, stronger images. Images meant to be printed, displayed and revisited over and over again. Images chosen with care instead of buried in excess gallery full of similar or the same images. I worked less, but better. I showed up more present for my family. The work itself held more meaning. And my expensive hobby became a sustainable and profitable business. Undercutting Hurts the Entire Industry You may not realize it, but charging next to nothing and giving your images away doesn’t just affect one business. It plays a part in reshaping expectations across the ENTIRE photography industry - the very one YOU hope to be profitable in. It gives clients the message that photography is disposable, not a luxury. That someone will come along who will always do it cheaper. That education, experience, and talent don’t carry any real value. And eventually, when you need to raise your prices to survive and be profitable (and you will!) , you’ll be left undoing every single one of those very expectations. Price With Purpose From The Start Fair pricing isn’t about greed. It’s about longevity. It’s about building a business that allows space for creativity, for family and for a life outside of work — while honoring the value of the images themselves.It's about building a sustainable business and keeping this industry sustainable.

0 Why I Don’t Chase Photography Trends | Kamloops Newborn & Family Photographer
Trends: They come. They go. If you’ve spent any time scrolling Social Media platforms like Instagram and Pinterest, you’ve seen how quickly photography trends change. One year it’s bright and airy, the next it’s dark and moody. Certain poses, props, and editing styles suddenly appear everywhere — and just as quickly, they disappear. Trends in photography move fast—sometimes faster than a newborn growth spurt. As a Kamloops newborn and family photographer, I’ve watched countless photography trends come and go. And through all of them, I’ve remained steadfast in one thing: a timeless, consistent style that puts families first. Here’s why I don’t chase trends — and why that matters for your photos. Photography Trends Come and Go — Memories Don’t Trends are designed for the moment. They’re influenced by algorithms, social media pressure, and what’s currently popular online — not by longevity. What looks “in” today can feel dated surprisingly fast. I often hear parents say: “I loved these photos at the time, but now they don’t really feel like us.” That’s exactly what I aim to avoid. When you book a Newborn, Milestone or Family session with me, the goal isn’t to create images that match this year’s trend — it’s to create images you’ll still love years from now. A Timeless Photography Style That Lasts From the very beginning of my career, I chose to focus on a timeless, natural photography style that prioritizes Soft, neutral tones ,consistent lighting, simple, intentional styling and genuine connection. Your photos shouldn’t immediately reveal what year they were taken. Instead, they should feel classic, emotional, and true to your family. This approach ensures your images age beautifully — whether they’re hanging on your walls or tucked into an album you flip through years later. I’ve Seen the Trends — and the Regret As a professional photographer serving families in Kamloops, BC, I’ve seen what happens when trends fade. Presets change. Editing styles fall out of favor. Props that once felt exciting suddenly feel distracting. You know what never goes out of style? Emotion. Connection. Simplicity. By staying consistent instead of trendy, I ensure my clients never feel like their photos belong to a specific “era” of social media. Why Consistency Matters for Families Many families I photograph return year after year — for newborn sessions, milestones, cake smashes, and family photos. Consistency matters when you’re documenting a growing family. A timeless style means: Your newborn photos still complement future family sessions Your gallery wall feels cohesive Your images tell a continuous story When trends change, consistency disappears. When style remains timeless, your memories stay beautifully connected throughout your family's growing journey. Your Story Comes First — Not the Algorithm I don’t photograph for trends, viral reels, or what’s performing best online. I photograph for families in Kamloops who want images that feel real, emotional, and lasting. Your story deserves more than a trend.It deserves photographs that still feel right years from now. Looking for a Kamloops Newborn or Family Photographer? If you’re drawn to timeless, emotion-filled photography and want images that won’t feel dated next year, I’d love to work with you. Serving Kamloops, BC and surrounding areasSpecializing in newborn, baby, and family photography

0 Why Your Baby's First Year Deserves More Than Just One Photo Session
The first year of your baby’s life is a season unlike any other. It’s not just about watching them grow—it’s about how quickly everything changes. One day you’re holding a sleepy newborn who fits perfectly in the crook of your arm. A few months later, they’re smiling, rolling, sitting, and suddenly they’re a small person reaching for you with intention. Before you know it, you’re planning a first birthday and wondering how the year disappeared so fast. That’s why the first year deserves more than just one photo session. The First Year Isn’t One Moment—It’s Many So often, parents book a newborn session and think, that’s enough. And while newborn photos are incredibly important and meaningful, they capture only the beginning chapter of a much bigger story. Your baby’s first year includes tiny, curled newborn days, bright, curious eye contact around 3–4 months, sitting, giggles, and personality shining through at 6–8 months, and standing, clapping, cake smashing, and celebrating one whole year! Each stage is fleeting. Each stage looks different. And once it’s gone, it doesn’t come back. Newborn Photos Capture Details—Milestone Photos Capture Growth Newborn sessions are about those tiny, brand new details: tiny fingers and toes, flaky skin, the sleepy, curled up poses… Milestone sessions are about growth: the way your baby smiles and giggles, their shyness or sense of curiosity and all the developmental milestones they’ve newly mastered. By documenting more than one stage, you’re not just photographing your baby’s arrival—you’re capturing the full story of their first year. Babies Change More in One Year Than Any Other Time There is no other year in your child’s life where growth happens THIS fast. Their face changes. Their expressions change. Their personality unfolds right in front of you. Looking back at multiple sessions from their first year allows you to see that transformation in a way a single session never could. Photos Become More Meaningful Over Time In the early days of becoming a new parent, photos feel SO special. You take millions it feels likes! Years later, they feel priceless. One day, they will become reminders of how small your baby once was, proof of how much love surrounded them from the very beginning, and images your child will one day cherish. When you document the first year intentionally, you’re creating a visual legacy—not just for now, but for the future. The First Year Is Worth Remembering Fully You’ll never regret having too many photos of your baby - However, you WILL regret not capturing more of the moments that mattered most. The first year isn’t just about milestones—it’s about becoming a family, learning each other, and watching your baby grow. And that story deserves more than just one photo session. Are you a Kamloops mom who’s currently pregnant, expecting a baby in 2026? Maybe you missed the Newborn window but still want to capture these important Milestones? Let's chat! I’d love to help you document your baby’s First Year!